
How to Clean and Maintain Your Handheld Vacuum Filter: A Complete Guide
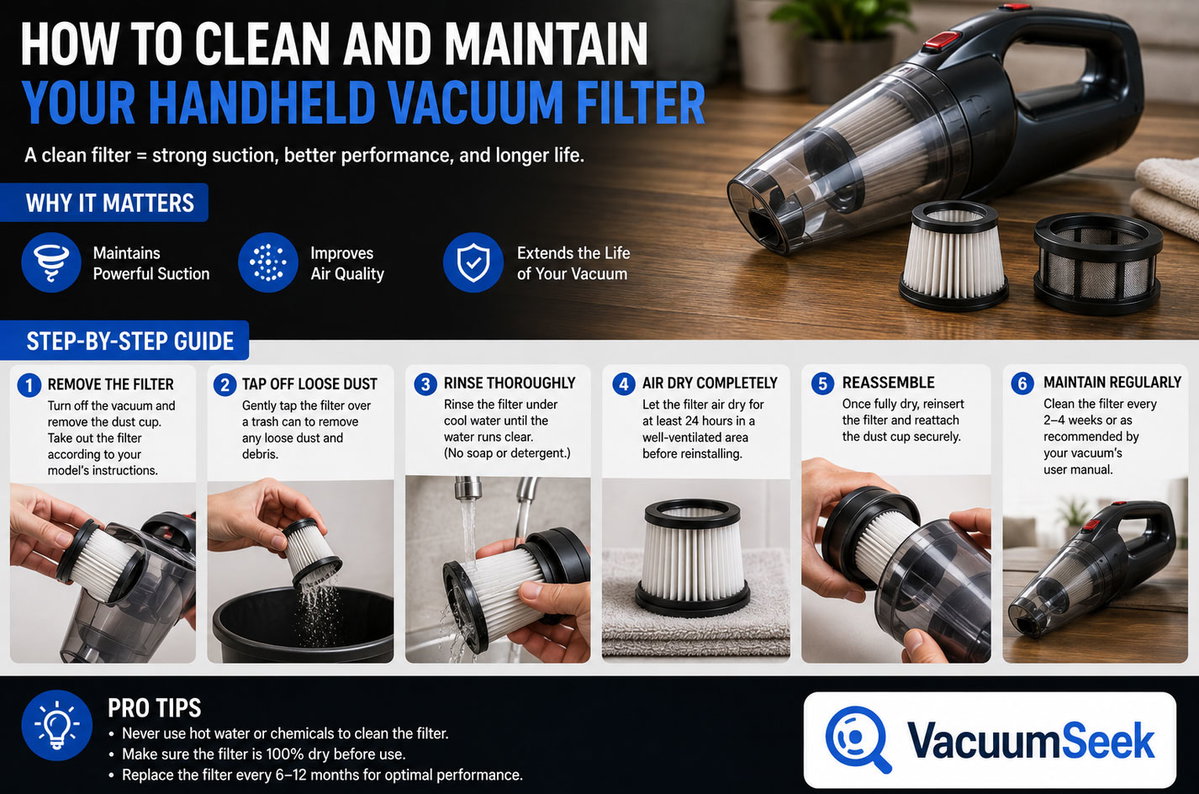
A handheld vacuum lives a hard life. It gets shoved under car seats, dragged across cereal-crusted counters, and asked to inhale everything from drywall dust to cat hair without complaint. Through all of that abuse, one small component absorbs most of the punishment and gets almost none of the credit: the filter. Neglect it, and even a brand-new machine will start to feel weak, wheezy, and short on patience. Take care of it, and that same little vacuum will keep pulling debris out of your carpet like it just came off the shelf.
This guide walks through exactly how to clean a handheld vacuum filter, how often to do it, which mistakes quietly ruin filters early, and when cleaning stops being enough and replacement becomes the smarter move.
Why Your Filter Is the Most Important Part of Your Vacuum
Suction is not created by the motor alone. It is created by airflow, and airflow depends entirely on how freely air can pass through the machine. The filter sits directly in that path, trapping dust, pollen, pet dander, and fine particles before they can reach the motor or, worse, get blown back into the room you just cleaned.
A clogged filter is the single most common reason a handheld vacuum "suddenly" loses power. People often assume the motor is dying or the battery is failing, when in reality the machine is simply trying to breathe through a mask packed with lint. Restoring airflow by cleaning the filter is, in most cases, the fastest and cheapest fix available — far cheaper than a replacement motor and far less wasteful than tossing the whole unit.
There's also a health angle worth taking seriously. A dirty filter doesn't just slow the vacuum down; it can start releasing the very particles it was supposed to trap, especially fine dust and allergens. For households with pets, allergies, or asthma, a well-maintained filter is doing real work for indoor air quality, not just appliance performance.
Know Your Filter Before You Clean It
Not every filter is built the same way, and cleaning the wrong type incorrectly can wreck it in seconds. Before you touch a drop of water to anything, figure out what's actually inside your machine.
HEPA Filters
HEPA stands for High-Efficiency Particulate Air, and these filters are designed to capture at least 99.97% of particles down to 0.3 microns — the gold standard for allergen and fine-dust control. Many HEPA filters used in handheld vacuums are washable, but not all of them are, so this is the first thing to confirm rather than assume.
Foam Filters
Foam filters are common as a pre-motor or secondary filter, often paired with a HEPA or pleated filter. They're almost always washable and reasonably forgiving, but they degrade with repeated washing and eventually lose their shape and effectiveness.
Pleated Paper Filters
These maximize surface area by folding the filter material into accordion-style pleats. They're excellent at trapping fine dust but are almost never washable — water breaks down the paper fibers and can tear the pleats or cause mold growth inside the folds.
Washable vs. Non-Washable
This single distinction matters more than the filter's material or brand. Washing a non-washable filter can permanently damage it, reduce its filtration efficiency, or trap moisture that leads to mildew and bad odors every time the vacuum runs. Your owner's manual will state this explicitly, and most manufacturers also print a small icon (often a water droplet with a line through it) on the filter housing itself. If you no longer have the manual, most manufacturer support sites host digital versions.
What You'll Need
Cleaning a filter properly doesn't require anything exotic. Gather the basics before you start so you're not improvising halfway through:
- A soft-bristled brush (an old toothbrush works well)
- A dry microfiber cloth or paper towels
- A small bowl of lukewarm water (only for washable filters)
- Mild dish soap (optional, for stubborn buildup)
- A well-ventilated, dry space with at least 24 hours of drying time available
- Compressed air, if you have it, for foam and pleated filters that can't be washed
Step-by-Step: How to Clean a Washable Filter
Step 1: Power Down and Remove the Filter
Always turn off and unplug or power down the vacuum before opening it up. Most handheld models release the filter with a simple twist, pull, or button latch near the dust cup. Refer to your manual if the mechanism isn't obvious — forcing a filter housing that doesn't budge is a fast way to crack the plastic.
Step 2: Tap Out Loose Debris
Before any washing happens, tap the filter gently against the inside of a trash can or hold it over a bin and knock loose debris free with your hand. This removes the bulk of the dust without pushing it deeper into the filter media, which is exactly what running water does if you skip this step.
Step 3: Brush Away Embedded Dust
Use the soft brush to work through any remaining dust caught in the pleats, foam pores, or mesh. Light, even strokes in one direction work better than scrubbing, which can distort the filter's shape or push debris further in rather than out.
Step 4: Rinse Under Cool or Lukewarm Water
If your filter is confirmed washable, hold it under a gentle stream of cool to lukewarm water, running the water in the opposite direction of normal airflow. This flushes trapped particles out the way they came in rather than pushing them deeper. Avoid hot water, which can warp foam or plastic frames, and avoid high-pressure streams, which can tear delicate mesh.
Step 5: Use Mild Soap Only If Necessary
For filters with greasy buildup — common in kitchens or homes that vacuum near cooking areas — a small amount of mild dish soap worked in gently can help. Rinse thoroughly afterward; any soap residue left behind will attract more dust once the filter dries and goes back to work.
Step 6: Dry Completely Before Reinstalling
This is the step people rush, and it's the one that causes the most damage. A filter that goes back into the vacuum even slightly damp will trap moisture against the motor housing, leading to musty odors, mold growth, or in worse cases, electrical issues. Lay the filter flat on a dry towel in a well-ventilated area, away from direct sunlight or heat sources that could warp it, and give it a full 24 hours minimum. Squeezing a foam filter gently between clean towels can speed this along without damaging the material.
Cleaning Non-Washable and HEPA Filters Safely
Not every filter can go near water, and treating one like it can is one of the fastest ways to destroy it. For non-washable filters, the process is entirely dry:
- Tap the filter firmly against a trash bin to dislodge loose particles.
- Use a soft brush to sweep debris out of the pleats or mesh, working in the direction the pleats fold rather than against it.
- If you have access to a can of compressed air, hold it several inches away and use short bursts, blowing from the clean side toward the dirty side to push debris out rather than further in.
- A handheld vacuum attachment (on a separate, larger vacuum) can also gently suction loose dust off the surface without introducing any moisture.
If a non-washable filter looks discolored, matted, or is releasing a musty smell even after dry cleaning, that's a sign it has absorbed more than surface dust and is due for replacement rather than another cleaning cycle.
How Often Should You Clean Your Filter?
There's no single universal number, because it depends heavily on how the vacuum is used, but a reasonable baseline works for most households:
- Light, occasional use (quick spot cleanups, small apartment): every 2–3 weeks
- Regular household use (daily or near-daily cleaning): weekly
- Heavy use (pet hair, workshops, sawdust, renovation debris, frequent car detailing): after every 2–3 uses, or even after each use in extreme cases
A simple habit that works well: check the filter every time you empty the dust cup. It takes ten seconds to glance at it and decide whether it needs a full clean or can wait a few more uses.
Signs Your Filter Needs Replacing, Not Just Cleaning
Cleaning extends a filter's life, but it doesn't extend it forever. Every wash or dry-brush cycle removes a small amount of material, and eventually the filter reaches a point where cleaning stops restoring performance. Watch for these signals:
- Persistent loss of suction even immediately after a thorough cleaning and full drying period
- Visible tears, thinning, or holes in the mesh, foam, or pleated paper
- Discoloration that won't lift, especially yellowing or graying that soap and water don't touch
- A musty or sour smell that returns even after the filter has fully dried
- Foam that's lost its springiness and stays compressed or brittle instead of bouncing back
- Frayed or crumbling edges around the filter frame
Most manufacturers recommend full filter replacement every 6 to 12 months under normal use, though washable HEPA filters in higher-end machines can sometimes stretch closer to 18 months with diligent care. When in doubt, compare suction with the filter removed entirely (briefly, and only for testing) against suction with the cleaned filter reinstalled — a significant gap points toward replacement rather than a cleaning problem.
Common Mistakes That Shorten Filter Life
A surprising number of filter failures come down to a handful of repeatable, avoidable habits:
Washing a filter that was never meant to get wet. This is the most common and most damaging mistake. Always confirm washability before rinsing anything.
Reinstalling a filter before it's fully dry. Even filters that feel dry to the touch on the surface can be holding moisture deeper in the foam or pleats. Patience here protects the whole machine.
Using hot water or a dryer to speed things up. Heat warps foam, shrinks plastic frames, and can melt mesh backing. Air-drying is slower but far safer.
Scrubbing instead of brushing. Aggressive scrubbing tears pleats and mats foam, permanently reducing surface area and filtration efficiency.
Ignoring the filter until suction is already gone. By the time performance drops noticeably, the filter has often been overdue for cleaning for weeks.
Running the vacuum without a filter "just this once." Even a single use without the filter can send fine dust straight into the motor, shortening the life of the entire unit far more than a dirty filter ever would.
Using scented cleaning products or fabric softeners on the filter. These leave residues that clog pores and can even damage certain filter materials over time.
Brand-Specific Care Notes
While the core principles apply across brands, a few manufacturer-specific details are worth knowing, and each brand's own support site is the most reliable place to confirm model-specific instructions, since filter design changes across product lines:
- Dyson machines typically use washable filters that the company recommends rinsing under cold water without soap, then air-drying for a full 24 hours. Model-specific guidance is available at dyson.com.
- Shark handheld and cordless models often include multiple filter stages, some washable and some not, and Shark's own care instructions are laid out by model at sharkclean.com.
- Bissell filters vary widely by product line, and the company publishes maintenance schedules and replacement part lookups at bissell.com.
- Hoover provides filter care and replacement guidance, including washable filter instructions, at hoover.com.
- iRobot, known primarily for robot vacuums but also handheld accessories, offers filter maintenance schedules at irobot.com.
- Tineco cordless and handheld vacuums come with app-connected maintenance reminders in some models, alongside written filter guidance at tineco.com.
- Black+Decker handheld and dustbuster-style vacuums typically use simple foam filters, with care instructions available at blackanddecker.com.
When a manual has been lost, searching the model number directly on the manufacturer's support site is usually faster than searching generically, since filter design and washability can differ even between closely related models in the same product line.
Storing and Protecting Your Filter Long-Term
Good storage habits matter almost as much as good cleaning habits. A filter that's stored poorly between cleanings will degrade faster no matter how carefully it was washed.
Keep spare filters in a dry, dust-free container rather than loose in a drawer, where they can pick up ambient dust before they're even installed. If you own a machine you use heavily, keeping one spare filter cleaned and ready to swap in means the primary filter always has a full drying window rather than being rushed back into service damp.
Avoid storing the vacuum itself in humid spaces like an unventilated garage or a bathroom closet, since ambient moisture in the air can seep into a filter even when the vacuum isn't running. A hallway closet, laundry room shelf, or dedicated storage spot with normal indoor humidity is a safer long-term home.
Troubleshooting: When Cleaning Doesn't Restore Suction
Sometimes a freshly cleaned, fully dried filter goes back in and the vacuum still feels weak. Before assuming the filter is the culprit, check a few other common suspects:
- Blocked hose or nozzle: debris can lodge in the intake path well before it ever reaches the filter.
- Full dust cup: an overfull bin restricts airflow just as much as a dirty filter does.
- Worn brush roll or belt: if the machine has a rotating brush, a tangled or slipping belt reduces pickup independent of filtration.
- Battery degradation in cordless models: reduced suction that correlates with reduced runtime often points to battery health rather than the filter.
- Cracked seals or gaskets: a filter housing that doesn't seal tightly lets unfiltered air bypass the filter entirely, which can look like a filter problem but isn't one.
If suction remains weak after ruling all of these out and confirming the filter itself is clean, dry, and undamaged, it may be time to contact the manufacturer's support line or consult an authorized repair center rather than continuing to troubleshoot at home.
Frequently Asked Questions
Can I use a hair dryer to speed up filter drying? No. Heat from a hair dryer can warp foam, shrink plastic housings, and damage mesh backing. Air-drying at room temperature, even though it takes longer, protects the filter's shape and material integrity.
Is it safe to vacuum up water with a handheld vacuum to test the filter? No. Standard dry vacuum filters and motors are not designed to handle liquid, and doing so can cause permanent damage well beyond the filter itself.
How do I know if my filter is HEPA or just a standard foam filter? Check the owner's manual or look for "HEPA" printed directly on the filter frame. If neither is available, the manufacturer's support site usually lists filter specifications by model number.
Why does my vacuum smell bad even after cleaning the filter? A lingering odor after cleaning usually means the filter wasn't fully dry before reinstallation, or that odor-causing residue has built up elsewhere in the dust cup or hose, not just the filter itself.
Can I clean a filter with a paper towel alone, without water or a brush? For light surface dust, yes, but a dry brush reaches embedded particles in pleats and foam pores that a paper towel simply wipes over.
Do reusable filters really save money compared to disposable ones? In most cases, yes, since a well-maintained washable filter can last many months longer than its disposable counterpart, though it does require more consistent upkeep to get that lifespan.
The Bottom Line
A handheld vacuum's filter is small, easy to overlook, and doing more work than almost any other part of the machine. A few minutes of regular attention — tapping out debris, brushing it clean, washing it only when the manufacturer says it's safe to, and giving it a full day to dry before it goes back to work — is the difference between a vacuum that feels brand new for years and one that starts losing steam within months. Treat the filter as routine maintenance rather than an afterthought, and the rest of the machine will keep performing the way it did on day one.